

How To Remove Windows 7 And Install Ubuntu
Nextcloud is an Open source cloud server application for homes and businesses to host their files to admission them from anywhere in the globe using the internet. Here we will see the tutorial on how to install NextCloud on Ubuntu 20.04 LTS Focal fossa.
What is Side by side Cloud?
NextCloud is a fork of some other open-source software called OwnCloud, still, it is now much popular. Equally I apprised above information technology is a server awarding that has the power to catechumen your small server such as Raspberry Pi into online storage; if you are then apprehended about your sensitive data to store them on services like Dropbox or Google Drive then you should try the Nextcloud.
Furthermore, you lot tin can use Nextcloud for video calls and edit documents with Collabora, which is based on LibreOffice.; along with back up to recognize Microsoft Office formats such as Md, DOCX, PPT, PPTX, and the Open Document Format (ODF).
Those are concerned well-nigh security, the Nextcloud provides industry compliance security features such as access command to files, protection against Bruteforce attacks, two-factor authentication, encrypted storage, and transfer of data.
requirements
The organisation requirements of NextCloud are not much high even we can run it on Raspberry pi 2.
- Linux WSL App on WIndows- Ubuntu 20.04 LTS or later version such as Ubuntu 18.04 LTS
- WSL should exist enabled on your Windows 10 system.
- Nextcloud needs a minimum of 128MB RAM or recommended 512MB on your Server or Desktop,
For this tutorial, nosotros will install the following things needed past the personal deject server application.
- Database: MySQL 5.7+ or MariaDB 10.2 or PostgreSQL 9.5+
- Webserver: Apache with mod_php or php-fpm or nginx with php-fpm
- Php: vii.three+
Steps to install Nextcloud on WSL Ubuntu 20.04 LTS
The steps given below will also piece of work on the full-fledged Ubuntu 20.04 LTS focal fossa Linux system including other versions.
1. Enable WSL and install Ubuntu twenty.04 App
Get to Windows 10 search and type "Turn Windows features on or off", as it appears, click on it to run. In that location ringlet downwardly and check the box given for "Windows subsystem for Linux" selection and click the OK button. After enabling, the setup will ask to restart the system do it.
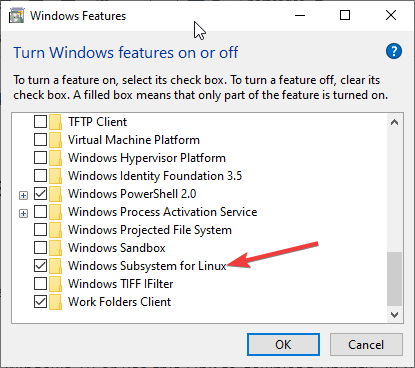
Enable WSL
Now, go to open Microsoft Store on Windows ten or use this Link to download Ubuntu 20.04 LTS Linux App.
2. Install Apache web server on WSL
Now, in the Windows ten search box, type Ubuntu and run information technology.
As nosotros know installing Apache is not a Sisyphean job on Ubuntu and the same goes for Ubuntu 20.04 Linux app running on Windows subsystem for Linux. Only run the single Linux control given beneath:
sudo apt install apache2
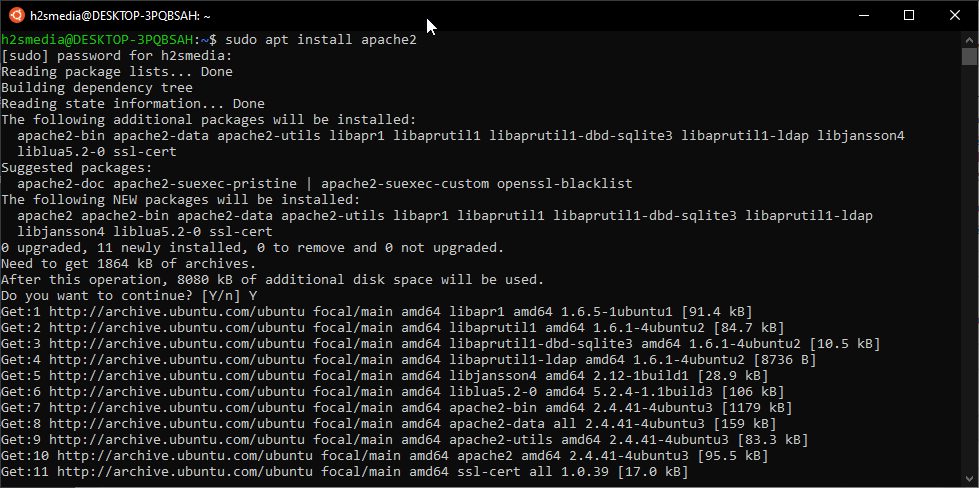
Ubuntu 20.04 WSL Apache webserver installation
Once the installation is completed, enable and bank check the Apache spider web server condition. When it asks yous to allow the Apache access through Windows 10 firewall, give information technology.
sudo service apache2 starting time
sudo service apache2 status
To cheque whether you tin access the static page of Apache on Windows 10, open up your browser and type: http://127.0.0.1
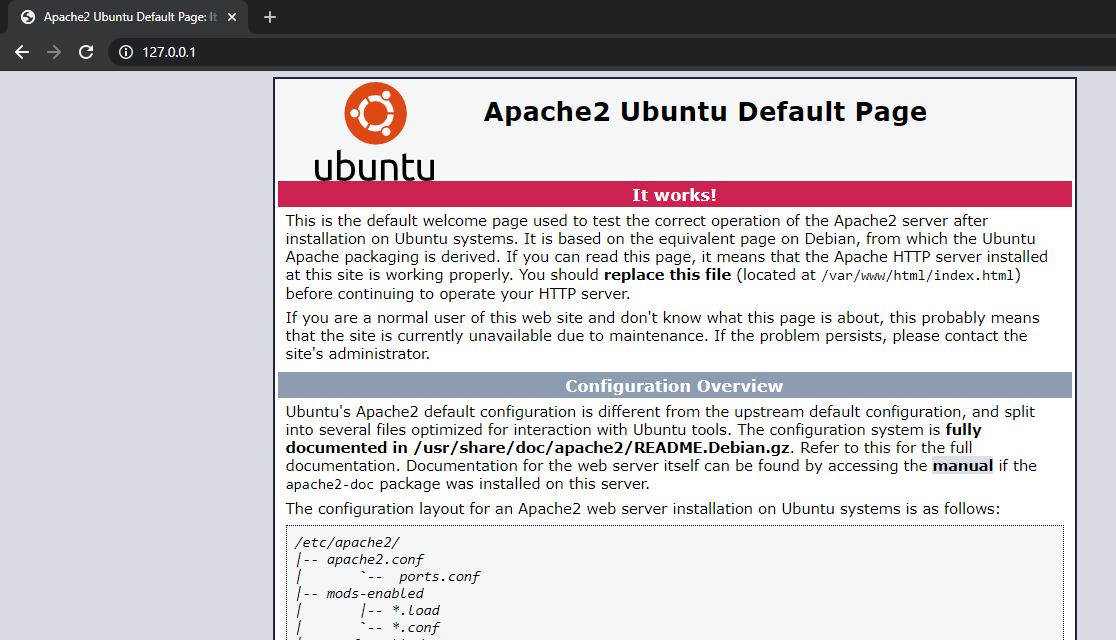
Apache on Windows ten
2. Install PHP on WSL (Windows 10)
The NextCloud is a PHP-based awarding, thus we likewise need to ready information technology along with some extensions which are required for the proper working server-side application.
By default, the PHP version available to install on via the official repository on Ubuntu xx.04 LTS is the latest stable version i.e PHP 7.iv. Thus, here is the control which y'all need to execute.
sudo apt-get install -y php-{curl,gd,fpm,cli,opcache,mbstring,xml,zip,fileinfo,ldap,intl,bz2,json,imagick,redis,mysql,mutual} sudo apt install libapache2-mod-php
Some other Extensions for server performance including LDAP integration and external user authentication
sudo apt install php-imap php-apcu php-memcached
If you are planning to utilise MySQL like nosotros are going to do hither then install its supported PHP extension:
sudo apt install php-mysql
In the same manner, those who are planning to employ the PostgreSQL database need this extension:
sudo apt install php-pgsql
3. Install MySQL for NextCloud on Ubuntu 20.04
Although you can use PostgreSQL, here we are most to install the popular MYSQL database for Nextcloud, thus the command for the aforementioned will exist:
sudo apt install mysql-server
By default, the Ubuntu 20.04 LTS repository contains MySQL viii.0.
Enable MySQL Service
Once the installation is washed, beginning the MySQL service:
sudo service mysql start
sudo service mysql condition
If everything is ok! you will get something like this:
[email protected]:~$ sudo service mysql condition * /usr/bin/mysqladmin Ver viii.0.19-0ubuntu5 for Linux on x86_64 ((Ubuntu)) Copyright (c) 2000, 2020, Oracle and/or its affiliates. All rights reserved. Oracle is a registered trademark of Oracle Corporation and/or its affiliates. Other names may be trademarks of their respective owners. Server version 8.0.nineteen-0ubuntu5 Protocol version ten Connection Localhost via UNIX socket UNIX socket /var/run/mysqld/mysqld.sock Uptime: 1 min 49 sec Threads: 2 Questions: 5 Tiresome queries: 0 Opens: 411 Flush tables: 3 Open tables: 27 Queries per second avg: 0.045 [email protected]:~$
Secure MySQL Installation
If you are planning to access and use information technology via a public network, then it is a good idea to secure the MySQL installation, first before creating users. Type:
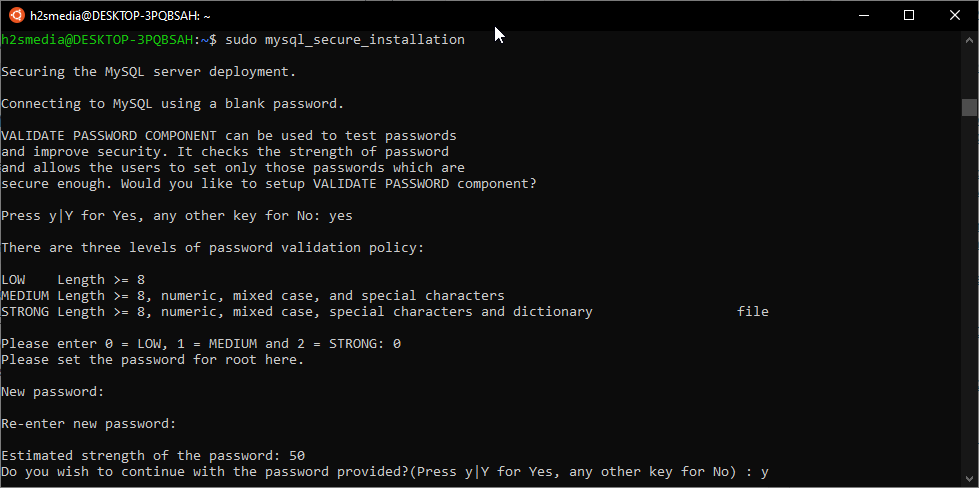
sudo mysql_secure_installation
The above command will run a script to secure MySQL installation in which it gives you series of options such as enabling countersign validation component; removing anonymous users; disable remote root login; set up a root password (blank past default); deleting demo database table and more…
Secure MySQL Installation
Yous can know more than about this on our detailed guide of MySQL installation on the Ubuntu 20.04 server.
Create a Database and user for NextCloud
"If you have secure and fix a password for MySQL then employ that one hither"
sudo mysql -p
The control to create a database and user.
CREATE DATABASE db_name_here;
Note: Supercededb_name_here with the database name you want to requite it.
CREATE USER 'h2suser'@'localhost' IDENTIFIED BY 'laissez passer';
Grant rights to manage database activities to the user y'all have.
GRANT SELECT, INSERT, UPDATE, DELETE, CREATE, Alphabetize, Driblet, Modify, CREATE TEMPORARY TABLES, LOCK TABLES ON db_name_here. * TO 'h2suser'@'localhost';
Note: Replace the h2suserwith the username andpass with the countersign you desire to assign.
get out
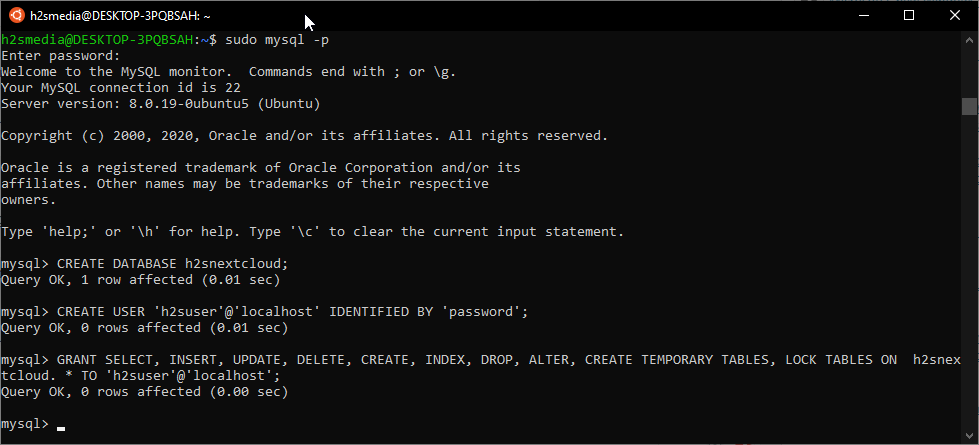
commands to create Database and user for Mysql 8.0
four. Download NextCloud
By the time, we are writing this article the latest version of the Nextcloud server edition available to download was eighteen.04, thus we get the same for installation.
Visit the Download page, right-click on the Download push button and copy the link.
Now, on your Ubuntu terminal type wget give space and paste the copied link. After hitting the enter button to download the NexxtCloud latest server version.
For case:
wget https://download.nextcloud.com/server/releases/nextcloud-x.x.xzip
The downloaded file of our was in zipped format thus, we as well need a small plan for that:
sudo apt install unzip
At present,
sudo unzip nextcloud*.zip
After inflating, move the file to Apache public binder
sudo mv nextcloud /var/world wide web/html/nextcloud/
Create a data binder inside the copied folder
sudo mkdir /var/world wide web/html/nextcloud/data
Set the permissions for the copied Nextcloud directory
sudo chown -R www-data:www-data /var/world wide web/html/nextcloud/
sudo chmod -R 755 /var/www/html/nextcloud/
five. Create nextCloud configuration file for Apache
Past default, Apache has the configuration file that points it to employ the files bachelor under /var/www/html folder, nosotros tin can edit that file to bespeak it to our nextcloud directory inside the HTML folder. However, it is a better idea to create a dissever configuration file, in case yous are planning to host multiple websites.
sudo nano /etc/apache2/sites-available/nextcloud.conf
Copy-paste the post-obit lines in that file.
Note: If you are want to employ a custom domain and then replaced your.server.com in the following with your domain name and update the DNS record for the aforementioned.
<VirtualHost *:80> ServerAdmin localhost DocumentRoot /var/www/html/nextcloud/ ServerName case.com ServerAlias world wide web.instance.com
<Directory /var/www/html/nextcloud/> Options +FollowSymlinks AllowOverride All Require all granted </Directory>
ErrorLog ${APACHE_LOG_DIR}/mistake.log CustomLog ${APACHE_LOG_DIR}/access.log combined </VirtualHost> To save and exit the above nano editor, first press CTRL+O and so CTRL+X.

Enable the newly created site:
sudo service apache2 reload
sudo a2ensite nextcloud.conf
Enable Apache Modules for Nextcloud
However, in most of the cases the post-obit modules will automatically go enabled, nevertheless to confirm run the below control:
sudo a2enmod rewrite headers env dir setenvif mime
Also, enable FPM support:
sudo a2enconf php*-fpm
Restart Apache
sudo service apache2 finish
sudo service apache2 start
six. Configuring NextCloud server on Ubuntu 20.04 WSL App (Windows 10)
Finally, we are at the final stage of the NextCloud setup using GUI. Open the browser on Windows ten and type http:127.0.01/nextcloud
Annotation: If you get a bulletin "Your data directory and files are probably accessible from the net because the .htaccess file does not work. For information on how to properly configure your server, please see the documentation."

Nextcloud error
To remove that follow the below steps. This appears because the .htaccess file of the Nextcloud would not exist able to override the default Apache configuration thus we straight edit that.
sudo nano /etc/apache2/apache2.conf
Scroll down and find these lines:
<Directory /var/www/> Options Indexes FollowSymLinks AllowOverride None Require all granted </Directory>
Now, replace the AllowOverride None to AllowOverride All
<Directory /var/www/> Options Indexes FollowSymLinks AllowOverride All Require all granted </Directory>
Finally, you will accept an error-free NextCloud login screen.
7. Login Nextcloud
Finally, enter the username and password you lot desire to register as an ADMIN account for NextCloud and so furnish the Database details. Last, click on the Cease Setup.
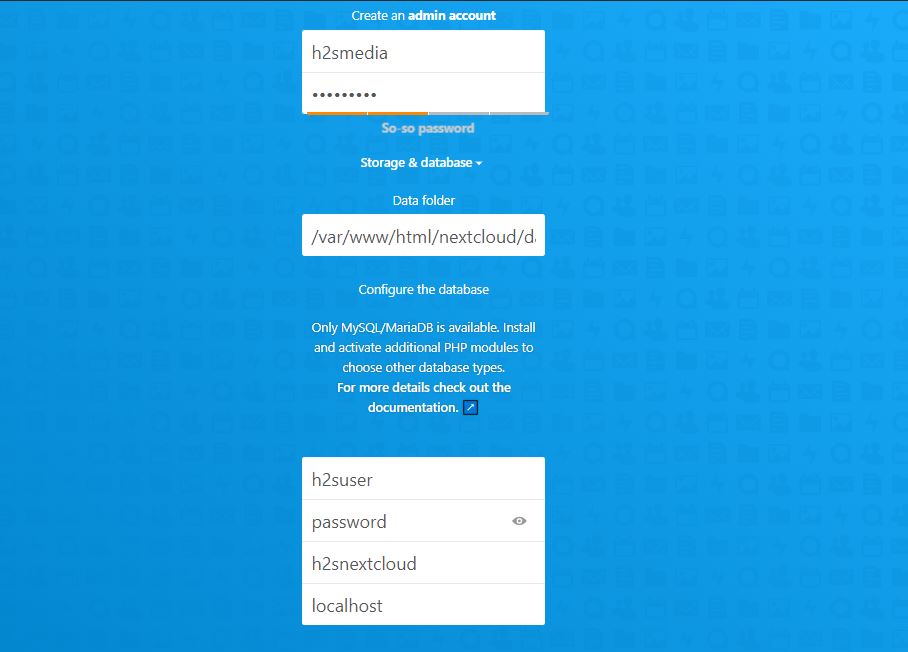
Create admin business relationship and connect database
Finally, yous will accept the Dashboard:

NextCloud on Ubuntu xx.04 LTS WSL APP
Change Information Folder (Optional step)
Past Default, any data nosotros upload to NextCloud will go to its data folder that is at /var/www/html/nextcloud/data, information technology is in the root directory; then, Ubuntu WSL is in the C drive of Windows ten, therefore NextCloud will consume your C: Drive to store all the uploaded files. However, nosotros tin change that.
Here, I am going to motility the data folder from my C: Drive to G: Bulldoze of the system, then that, all the uploaded files volition consume my G: Drive Infinite, and C: drive will remain free.
sudo cp -r /var/www/html/nextcloud/ /mnt/ drive-name Replace the drive-proper name with the 1 where you desire to relieve your all files.
For instance, I want it on K drive thus the control in my case was like this:
sudo cp -r /var/www/html/nextcloud/ /mnt/chiliad
Now, edit the NextCloud Config file:
sudo nano /var/www/html/nextcloud/config/config.php
Observe the line:
'datadirectory' ='/var/www/html/nextcloud/information'.
Supercede the current directory location with the one where you have copied the data folder.
For case, I accept copied it at /mnt/grand/information. Thus, I use the same. You can encounter that in the below screenshot.
Later on that save it: CTRL+O and get out using CTRL+10.
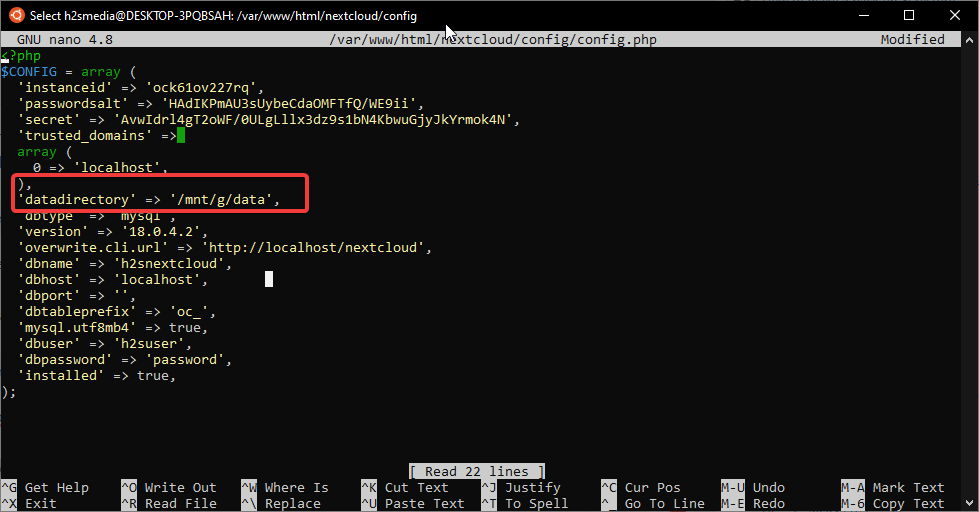
Nextcloud Data directory
Change the permission of your new information location:
sudo chmod 0770 /mnt/chiliad/data
sudo chown -R www-information:www-data /mnt/g/data
Notation: Replace /mnt/g/data with the location of your folder.
So, this was a quick tutorial on installing NextCloud on Ubuntu xx.04 WSL Linux app on Windows 10.
Source: https://www.how2shout.com/how-to/how-to-install-nextcloud-on-ubuntu-20-04-lts-wsl-windows-10.html
Posted by: houghfroopped81.blogspot.com
0 Response to "How To Remove Windows 7 And Install Ubuntu"
Post a Comment